How to Put on a Dog Harness: Simple Steps for Stress-Free Walks
Share
A properly fitted dog harness can make walks safer and more enjoyable for both you and your furry friend. While harnesses may look complicated at first glance, putting one on your dog is actually quite simple once you understand the process. This guide will walk you through everything you need to know about dog harnesses, from their benefits to step-by-step instructions for putting them on correctly.
Why Choose a Harness?
Traditional puppy collars have their place, but harnesses offer significant advantages for many dogs. A properly fitted harness distributes pressure across your dog's chest and shoulders rather than concentrating it on the delicate trachea area. This is especially important for breeds with respiratory issues, small dogs, or enthusiastic pullers who might injure themselves with a collar.
Harnesses also provide better control during walks, which is particularly valuable for strong or reactive dogs. They're significantly harder for dogs to back out of than collars, reducing the risk of escape during those heart-stopping moments when something unexpected catches your puppy's attention. Additionally, certain harness designs can help discourage pulling behaviors, making walks more enjoyable for everyone.
Things You Should Know
Before getting started, here are some important points to understand:
- Proper fit is crucial - you should be able to fit two fingers between the harness and your dog's body
- Different harness styles require different application methods
- A well-fitted harness should be snug but not tight
- Always reward your dog during and after putting on the harness
Know Your Harness Type
Before attempting to put on your dog's harness, you need to identify which type you have. Most harnesses fall into two main categories:
Step-In Harness
This style lays flat on the ground with two triangles for your dog's front legs. When you look at it on the floor, it typically forms a figure-8 shape. Step-in harnesses are perfect for dogs uncomfortable with items going over their head, particularly those who may have had negative experiences in the past. They're also ideal for quick on-and-off convenience once you've mastered the technique.
Overhead/Standard Harness
This more traditional style features a loop that goes over your dog's head first, then secures around the body. The design typically includes one loop for the neck and another for the chest/ribs, connected by straps that run along the back and sometimes the chest. These harnesses often provide additional security and work well for dogs who stay relatively calm during dressing.
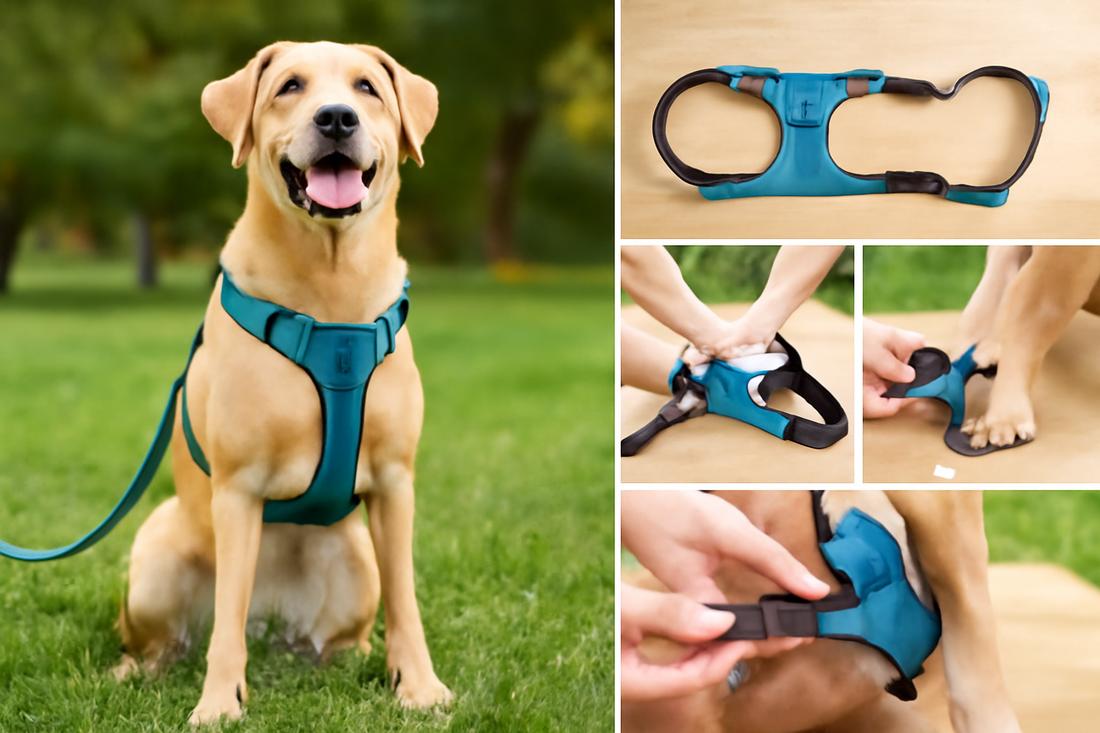
Step-by-Step: Putting on a Step-In Harness
The key to success with a step-in harness is starting with it completely flat on the ground. Follow these clear steps:
- Prepare the harness: Unbuckle the harness and lay it flat on the ground so the two leg holes are clearly visible, with the back piece (where the leash attaches) at the top and buckles facing upward.
- Position your dog: Have your dog stand in front of the harness, facing the same direction as the harness is laid out.
- Guide the paws: Gently lift each front paw one at a time and place them through the appropriate triangle. Their right paw goes in the right loop, left paw in the left loop.
- Lift and secure: Bring the sides of the harness up along your dog's body until they meet at the back. The harness should form a Y-shape at the chest.
- Fasten the buckle: Snap the buckle together securely on your dog's back.
- Check the fit: Ensure you can fit two fingers under all straps. Make any necessary adjustments to ensure the harness is neither too loose nor too tight.
- Reward: Give your dog a treat and enthusiastic praise. This positive reinforcement helps create a pleasant association with the harness.
Step-by-Step: Putting on an Overhead Harness
For overhead harnesses, a different approach is needed. Follow these steps for success:
- Identify the parts: Locate the neck opening (typically smaller) and the chest/rib opening (larger).
- Prepare your dog: Have your dog in a standing or sitting position, staying as calm as possible.
- Slip over the head: Gently slide the neck opening over your dog's head, being careful not to catch their ears. The wider loop with the buckle should go on first, followed by the narrower portion.
- Position correctly: Ensure the D-ring sits on your dog's back and any padding is properly positioned against the chest.
- Guide the first leg: Slip one of your dog's front legs through the appropriate leg hole. This leg should now be positioned between the chest loop and the neck loop.
- Secure the buckle: Bring the strap under and around your dog's belly, behind the other front leg, and fasten the buckle on your dog's back or side.
- Adjust for comfort: Make necessary adjustments to achieve that perfect two-finger space throughout all straps.
- Reward generously: Give treats and affection to reinforce that cooperating with harness time leads to good things.
Troubleshooting Common Problems
If your dog resists the harness, patience is key. Never force a frightened dog into a harness; this only creates negative associations that make future attempts harder. Instead, create positive connections by placing treats on and around the harness, letting your dog investigate at their own pace. Practice in short sessions, rewarding each small success, even if it's just sniffing the harness without running away.
For fit issues, ensure all straps lie flat without twisting, as twisted straps can cause uncomfortable pressure points. The chest piece should sit in the center of the chest, not riding up to the throat or slipping down to impede shoulder movement. Verify all buckles are fully secured before heading out, and adjust all straps to the same degree of snugness.
Making Harness Time Positive
The secret to harness success is creating consistently positive associations. Use high-value treats specifically reserved for harness time. Practice the process at home in a relaxed environment before attempting it before actual walks when excitement levels are higher.
Looking for a high-quality harness that's easy to put on and comfortable for your dog? Our premium harnesses combine comfort, control, and durability in one stylish package.